ByteBuffer使用解谜
目录
结构介绍
ByteBuffer是NIO产生的时候带出来的一个对象,是Channel读写数据的缓冲区

我们在使用NIO的时候通常会看到这样一行代码:
ByteBuffer allocate = ByteBuffer.allocate(1024);
它底层的实现是这样的,实际就是上图所标记的HeapByteBuffer

底层其实就是一个字节数组,但是有几个不同作用的指针,再我们执行完上面那行代码后,初始化的结构如下图所示:
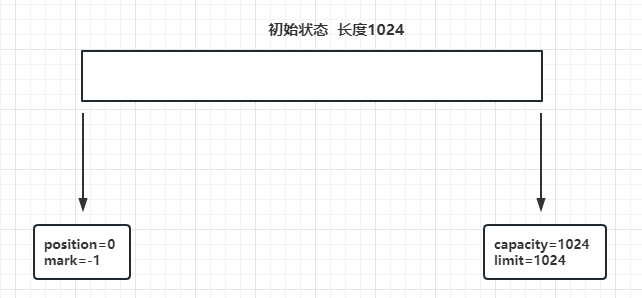
生成一个长度为1024的数组以及4个指针,分别是:
- position: 读写指针,在写的情况下,记录写数据的偏移量;在读的情况下,记录读数据的偏移量;
- capacity: 数组大小的边界(就是数组容量,不会变)
- limit: 读写边界指针,写数据的边界或者读数据的边界
- mark:标记指针,可以标记一个position的位置
📌重点:写或者读的空间都是 position——limit之间的空间
这样一看可能有点懵逼是吧,我们换个思路想,这个缓冲区分为读、写两种模式,像上图初始化后默认就是写模式,所以position到limit之间都是可写的空间(1024),每写入一个字节,position就会像前移动一个字节,假设我们写入 "Hello",一共五个字节,那内部就是这样的:
此时:position变为了5
可写空间为:position——limit 之间  可以继续写,position会一直向前移动
可读空间为:position——limit 之间  虽然可以读,但是读取不到数据
这就可以称为写模式
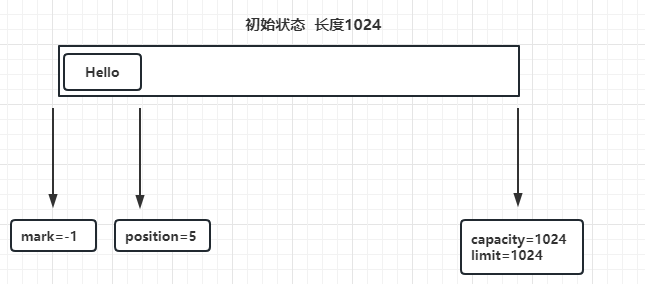
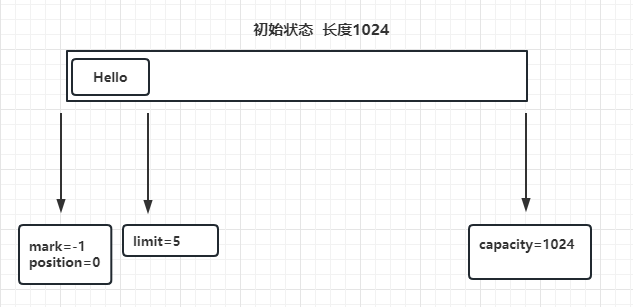
上图还是写模式,如果想读取数据,那就需要切换到读模式,切换后结构如下:
此时:position变为了0 ,limit变为了5
可写空间为:position——limit 之间  可以写,但是会覆盖之前内容且不得超过limit
可读空间为:position——limit 之间  所以可以读取数据,每读一个字节,position向前移动一个字节
这就被称为读模式
好了,到这相信大家有了一个大概的了解了
常用方法说明
ByteBuffer.remaining()
获取position—limit之间还有多少空间,也就是返回两者差值
常用来获取可读数据的长度,或者可写数据的空间大小
源代码如下:

ByteBuffer.hasRemaining()
判断是否还可读 或者 是否还有空间可写 true:可写或未读完 false:反之
常用来判断数据是否完全读取、是否还能写入数据
源代码如下:

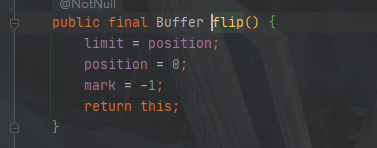
ByteBuffer.flip()
从写模式切换为读模式,实际就是移动指针
在写模式下,position指针会一直向前移动,我们想读取数据是在0——position之间的
所以我们需要将limit放到position的位置,position置为0,此时再读position-limit就是我们想要的数据啦
所以此操作可以称为写模式到读模式的切换
源代码如下:
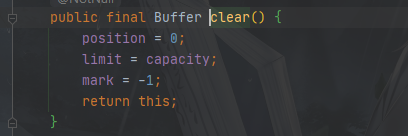
ByteBuffer.clear()
重置指针,将指针恢复到初始化的情况
恢复到初始化的指针情况,目的是让你可以重新的写入
此时注意,此操作只是重置了指针并没有清除数据
如果缓冲区内有数据,重置了后去读还是可以读取数据的
源代码如下:
ByteBuffer.rewind()
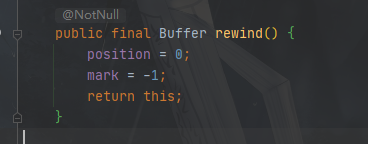
重置position指针
这个重置与上面的重置不同,只重置了position指针,有两层语义,同样不会清除数据
写模式下:可以让你重新写
读模式下:可以让你重新读

而clear则是强制恢复到初始位置
源代码如下:
ByteBuffer.mark()与ByteBuffer.reset()
是不是感觉mark指针没用到?这个只是个标记指针
ByteBuffer.mark()源代码如下:

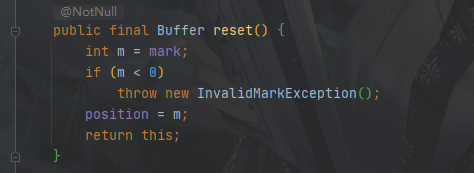
ByteBuffer.reset()源代码如下:
这两个方法一般搭配使用,场景就是position指针读取或者写入都会不断向前,要是中间有段内容想要重写怎么办?中间有段内容想要重新读取怎么办?所以我们打上一个标记点,之后方便重新回到这个标记点重新操作
- mark():记录当前position的位置
- reset(): 将position恢复到mark指针标记的位置
接着上面写入图来是这样的:
reset后不会清除数据,图示只是为了方便

get和put这种简单的就不说明了
实操演示
场景1:先写后读
// 初始化
ByteBuffer allocate = ByteBuffer.allocate(1024);
// 写入数据
allocate.put("Hello".getBytes());
// 切换指针 然后读取
allocate.flip();
// 初始化一个和可读数据一样大小的数组
byte[] bytes = new byte[allocate.remaining()];
// 将数据读取到数组中
allocate.get(bytes);
System.out.println(new String(bytes));

输出结果:Hello
场景2:写→标记→写→重置标记→写→读
// 初始化
ByteBuffer allocate = ByteBuffer.allocate(1024);
// 写入数据
allocate.put("Hello".getBytes());
// 标记
allocate.mark();
// 写入数据
allocate.put(" Hello".getBytes());
// 重置到标记点
allocate.reset();
// 再重新写,覆盖之前的错误数据
allocate.put(" World!".getBytes());
// 切换指针 然后读取
allocate.flip();
// 初始化一个和可读数据一样大小的数组
byte[] bytes = new byte[allocate.remaining()];
// 将数据读取到数组中
allocate.get(bytes);
System.out.println(new String(bytes));

输出:Hello World!
场景3:写→标记→写→重置标记→读
// 初始化
ByteBuffer allocate = ByteBuffer.allocate(1024);
// 写入数据
allocate.put("Hello".getBytes());
// 标记
allocate.mark();
// 写入数据
allocate.put(" World!".getBytes());
// 重置到标记点
allocate.reset();
// 切换指针 然后读取
allocate.flip();
// 初始化一个和可读数据一样大小的数组
byte[] bytes = new byte[allocate.remaining()];
// 将数据读取到数组中
allocate.get(bytes);
System.out.println(new String(bytes));

输出:Hello 因为重置到标记点了,标记点后的数据就读取不了
场景4:写→读→判断数据是否完全读取→没读完继续读
// 初始化
ByteBuffer allocate = ByteBuffer.allocate(1024);
// 写入数据
allocate.put("Hello World!".getBytes());
// 切换指针 然后读取
allocate.flip();
// 初始化一个和可读数据一样大小的数组
byte[] bytes = new byte[5];
// 将数据读取到数组中
allocate.get(bytes);

String data=new String(bytes);
// 才读了5个字节肯定没读完
while (allocate.hasRemaining()){
    System.out.println("没读完继续读");
    byte[] bytes1 = new byte[allocate.remaining()];
    allocate.get(bytes1);
    data+=new String(bytes1);
}
System.out.println(data);

输出:
没读完继续读
Hello World!
场景5:写→重复读
// 初始化
ByteBuffer allocate = ByteBuffer.allocate(1024);
// 写入数据
allocate.put("Hello World!".getBytes());
// 切换指针 然后读取
allocate.flip();
// 初始化一个和可读数据一样大小的数组
byte[] bytes = new byte[allocate.remaining()];
//重复读三次
for (int i = 0; i < 3; i++) {
    // 将数据读取到数组中
    allocate.get(bytes);
    System.out.println(new String(bytes));
    // 重置position指针到0
    allocate.rewind();
}

输出:
Hello World!
Hello World!
Hello World!
总结
可以看到ByteBuffer底层结构和逻辑都是比较简单的,所有的操作也都是和指针有关,只要把指针这块的逻辑搞清楚了,就算使用时忘记了,直接看一下源码也就OK了
